|
The "Bazooka" With the beginning of WWII American designers realized the Army lacked an adequate infantry weapon to counter advancements in tank technology. During the 1930's a shoulder launched rocket prototype had been developed, with the great advantage of being recoilless, but its small HE warhead lacked effectiveness. During this same period anti-tank rifle grenade development, utilizing hollow charge technology, resulted in an effective grenade (M10) but its large size produced too much recoil to be fired without harm to both the rifle and shooter. The idea of combining the M10 warhead with the rocket gave rise to the "2.36 inch Rocket Launcher". (The diameter being that of the M10 grenade.) |
|
|
WWII Variations The "Bazooka" was rushed into production to be ready for use in the 1942 African Campaign. Initial shipments were, literally, made with the paint still wet. As would be expected with any new weapon design there were bugs that needed to be worked out. There were three variations of the 2.36 inch Rocket Launcher. The first was the M1 (w/M6 Rocket), issued in July 1942 and shown above. It had a 54 inch steel launch tube tube, and weighed 18lbs. Problems with reliability resulted in changes to the electrical design. The launcher and rocket were modified and released in July 1943 as the M1A1 (w/M6A1 Rocket). Further enhancements involved making the tube a two piece assembly, further improving the electrical system and lessening the overall weight. While the length of the assembled tube was increased to 61 inches, weight was reduced to 15.8lbs. The new design was given the designation M9/M9A1(w/M6A3 Rocket) and adopted in October 1943. |
||
|
Rockets - M6A3C (top) M6A1 (bottom) The earlier M6A1 had problems with deflection at low angles of impact. The M6A3C with its rounded nose improved on that. Changing to a cylindrical fin assembly increased stability in flight. The steel cone inside the warhead was changed to copper which improved penetration performance from about 3 up to 4 inches of homogenous armor plate. (Under ideal circumstances.) |
||
 Note the paint discoloration on the M6A3C. This is a result of removal of the explosive by burning. The M6A1 apparently was never filled, as the warhead is unmarked. |
||
 Operation
The rocket was electrically fired. Power was provided by batteries stored in the launcher for the M1 and later, a trigger-operated magneto for the M9. The motor was designed to burn out just prior to leaving the muzzle. This was to protect the gunner from back blast, although the exhaust out the back of the launch tube was hazardous to anyone close. Muzzle velocity was only about 270 fps but that was sufficient to achieve point accuracy out to 300 yards. The fuze was a very simple impact type shown here. Once the safety pin was removed, the weighted striker was held only by the light creep spring. Once armed, the round would detonate if dropped on its nose from about shoulder level. |
||
|
|
||
|
Links to Additional Information www.wk2ammo.com I recommend this web site for some fantastic cut-away displays. On the site are some much larger images. For a very interesting first hand evaluation of the performance of the Bazooka on a German Panther V, Click on the tank. 
M7 Practice Rounds and How to Tell the Difference between those and the M6 HEAT! Recently (July '05) there was a 2.36" rocket (Supposedly a M6A1) which sold at auction described as: "The original AT Rocket... Found in the 50's in the warehouse of a farmer in the area of bastogne. This one is in really perfect shape... Well dated 1941 on the body." I suspect it was a repainted restenciled M7A1 Round, for three reasons: o First, the bazooka wasn't issued for use until late 1942. o Second, by the time of U.S. involvement around Bastogne (Late 1944), the M6A1 had been replaced by the M6A3. (Although I have been informed by a current day relic hunter that examples of M6A1 rockets have been found in the region - no photos or details provided, but I have no reason to doubt his claim.) o Third, there was no mention of the internal H.E.A.T., Cone (Important detail!) |
|
| There are no outward mechanical differences
between the M6 HEAT and the M7 Practice rounds, other than paint and
stencil. However, there is one major difference not likely to
be faked, the internal HEAT cone. (Visible in the sectioned view above.) When manufactuered, the nose assembly is crimped together as a single unit. The HE filler is poured in place, (in a molten state), then hardens to a solid. Once filled, the stencil is applied. To remove the filler you either have to burn it out, or melt it with steam. This is probably why inert M6 HEAT rounds don't show up often as war souvenirs, too difficult to deal with. The M7A1/A3 Practice were manufactured without that cone, which was necessary to make room for a counterweight rod to simulate the correct mass and center of balance of the live round. Show here are M7 practice and M6 HEAT components. The HEAT rounds have the internal cone. (I tried to photograph them, but couldn't do it satisfactorily. They are present however and visible through the bottom.) The counter balance rods screw into the same cavity as otherwise occupied by the fuze. An intact fuze assembly would be another indicator of an authentic M6 HEAT round, but that is easily reproduced. |
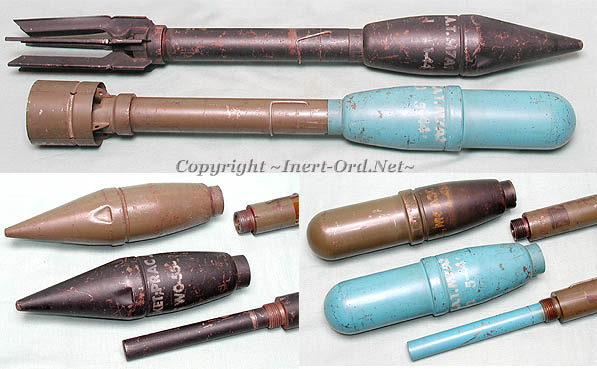 |
M7A1 Practice M7A3 Practice (Left) M6A1 HEAT M7A1 Practice w/ Rod (Right) M6A3 HEAT M7A3 Practice w/Rod | ||
| 24.09.16 |